Spring Planting Guide: How to Have the Most Amazing Yard on Your Street
Plan with confidence! Our spring planting guide for Southern Ontario covers what you should do before and after your first frost-free date

Spring in Southern Ontario can feel like a fake-out. One week it’s sunny and warm, the next you’re scraping frost off the windshield again. That’s exactly why the first frost-free date matters so much—because it’s the clean dividing line between “you can prep” and “you can plant with confidence.”
This guide is built around that timing. You’ll learn what to do before your frost-free date to set your yard up for success, and what to do in the weeks just after so everything takes off fast and looks intentional—not patchy, messy, or “thrown together.”
By the end, you’ll know how to plan your beds and planting areas, pick the right plants for Southern Ontario, stay ahead of pests and disease, and pair it all with smart lawn care so the whole property looks sharp.
This guide is a practical roadmap for a standout lawn and garden. We’ll cover:
- Navigating Your First Frost-Free Date
- Post Frost-Free Date Timing and Checklist
- Planning Your Garden for Maximum Impact
- Ground Cover, Bulbs, Raised Beds, and Planters
- Perennials, Annuals, Shrubs, Native Plants, and Pollination
- Bugs and Disease in Early Garden Season
- Lawn Care Treatment in Spring
- Lawn Care Maintenance for a Standout Yard

Post Frost-Free Date Timing and Checklist
Once you’ve hit your first frost-free date, you’re officially in “go time” for Southern Ontario spring planting—but the next few weeks still matter. Planting is safer now, yet your yard is also waking up fast: weeds start moving, soil dries out unevenly, and one neglected area can make the whole property look behind. Use this timing checklist to keep everything looking crisp and intentional.
First 48 hours after frost-free date
- Do a quick yard walk: note soggy spots, bare lawn areas, and beds that need a top-up.
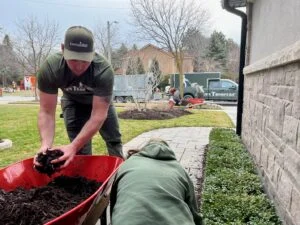
- Finish bed prep: tidy edges, remove winter debris, and add compost where you’ll be planting.
- Set up your basics: hoses, timers, and a consistent watering plan (especially for new plantings).
Days 3–7
- Start planting your “structure” first: shrubs, hardy perennials, and anything that creates shape.
- Refresh mulch only after soil has warmed a bit—aim for tidy coverage, not a thick blanket.
- Begin lawn season properly: first real mow at a higher setting, then maintain a consistent schedule.
Weeks 2–3
- Add your colour layer: annuals, planters, and the plants that make the yard pop from the street.
- Watch for pests early (especially on fresh growth) and fix the cause first: crowding, overwatering, poor airflow.
- Spot-treat problem lawn areas: fill low spots, reseed thin patches if conditions are right, and stay on top of weeds.
Weeks 4–6
- Shift from planting mode to “keep it looking great” mode: deadheading, light feeding, trimming edges, and a weekly tidy.
- Dial in maintenance: mow high, water deeply when needed, and keep borders sharp.
The biggest win in this window is sequencing: structure first, then fill, then colour—while you lock in a routine that keeps the yard looking like it’s professionally maintained.
Planning Your Garden for Maximum Impact
If you want a yard that looks “put together” (not random), planning is the cheat code. The goal isn’t more plants—it’s better placement and a simple structure you can repeat. Start by identifying your high-visibility zones: the front walkway, the area around the porch, the driveway edge, and the sections you see from the street. These spots deserve your best effort because they deliver the biggest curb appeal return.
Next, map the basics. Watch where sun hits in the morning and late afternoon, and note areas that stay damp after rain. In Southern Ontario, drainage and spring moisture matter as much as sunlight. A plant that “likes full sun” may still struggle if the soil stays cold and wet.
Then build your garden in layers:
- Back layer: taller shrubs or upright perennials that create height and privacy
- Middle layer: medium perennials for fullness and repeating colour
- Front edge: low plants or ground cover for a clean, finished border
Use repetition to make the design look intentional. Pick 2–3 main plants and repeat them in clusters rather than planting one of everything. Add contrast with leaf texture and shape (not just flower colour), because foliage is what makes the yard look good for months, not days.
Finally, plan for maintenance. Leave enough space between plants for airflow and easy weeding. Build in access points so you’re not stepping into beds all summer. A great spring garden isn’t just planted—it’s designed to stay attractive with realistic upkeep.
Ground Cover, Bulbs, Raised Beds, and Planters
These four elements are how you make a yard look “finished” fast—especially in spring when beds can look bare. Ground cover is your living mulch: it fills gaps, reduces weeds, and softens edges. Use it where grass struggles (under trees, along shady borders) and on slopes where mowing is annoying. Avoid using aggressive spreaders in small beds unless you’re okay with constant trimming.
Bulbs are the earliest wow-factor in Southern Ontario. If you already have spring bulbs, let the foliage die back naturally after flowering—cutting it early weakens next year’s blooms. If you’re planning for next spring, bulbs are usually planted in fall, but spring is when you decide where you want that pop of early colour.
Raised beds warm up faster than in-ground beds, which makes them ideal for the frost-free transition window. They also solve drainage problems and make planting feel organized. Keep the soil simple: quality triple mix + compost, and don’t overpack it.
Planters are instant curb appeal. A good container design has structure, fullness, and spill:
- one “tall” focal plant
- a few “filler” plants for body
- one trailing plant to soften the edge
Because planters dry out quickly, your success is mostly watering consistency—especially in the first 2–3 weeks after frost-free date.
Perennials, Annuals, Shrubs, Native Plants, and Pollination
Choosing plants is where most yards go off the rails. The easiest way to get it right is to give each plant type a job.
Shrubs are your structure. They make beds look designed even when nothing is blooming. Think of them as the “bones” of your yard—reliable shape, repeatable, and low drama. Use them to frame entrances, anchor corners, and add year-round presence.
Perennials are your long game. They return every year and build fullness over time. Use them for repeated colour and texture, and group them in clusters so they read from the street.
Annuals are your quick win. They’re perfect for planters, front edges, and anywhere you want bold colour that lasts all season. In Southern Ontario, annuals are best planted after frost-free date so they don’t stall in cold soil.
Native plants are the low-maintenance advantage. They’re adapted to local conditions, often need less babying once established, and support local insects and birds. If you want a yard that gets easier every year, natives are a strong foundation.
For pollination, focus on variety and timing. Choose a mix of blooms that cover early, mid, and late season, and include different flower shapes. Pollinator-friendly doesn’t mean messy—it just means thoughtful plant choices and avoiding heavy-handed sprays. A small, well-planned pollinator strip can boost blooms and make your whole yard feel alive.
Bugs and Disease in Early Garden Season
Early garden season is when small problems turn into big ones—mostly because plants are tender, nights are cool, and growth is soft. The best approach is prevention-first: healthy plants resist issues better than stressed plants.
Start with the basics: airflow, spacing, and watering habits. Crowded plantings trap moisture, which encourages fungal problems. Watering late in the day keeps leaves wet overnight—also a common trigger for disease. Aim to water early, and water the soil, not the leaves.
In Southern Ontario spring, you’ll often see pests that target new growth. The key is to catch patterns early: curled leaves, chewed edges, sticky residue, or plants that suddenly stop thriving. Before you reach for any product, check the cause. Overwatering, compacted soil, and poor drainage can mimic disease symptoms and make pest damage worse.
For most issues, start with low-impact fixes:
- Remove damaged leaves
- Improve spacing and airflow
- Rinse pests off with water
- Clean up fallen debris that can harbour problems
Only escalate if the issue spreads quickly or threatens the whole planting area. The good news: if your planting plan includes proper spacing and you avoid overfeeding early, you’ll prevent most headaches. A yard that looks great isn’t one that never gets pests—it’s one where problems are handled early and calmly.
Lawn Care Treatment in Spring
Great gardens look even better when the lawn is clean and even. Spring lawn treatment is less about “doing everything” and more about timing the right moves so weeds don’t get a head start once the weather warms.
Your first goal is consistent growth. Once mowing begins, the lawn starts behaving like a system: frequent cuts encourage thicker turf, and thicker turf naturally crowds out weeds. Keep mowing height on the higher side—short mowing is the fastest way to invite dandelions and crabgrass later.
Next, think in priorities:
- Weed pressure control: catch weeds early while they’re small
- Nutrition: light feeding can help the lawn green up and recover
- Bare spot strategy: only reseed when conditions support germination
In the weeks after frost-free date, avoid going too heavy with fertilizer if the lawn is still uneven or stressed. Overfeeding can cause fast top growth without strong roots, and it can also feed weeds. If you’re applying any treatments, stay consistent with watering rules and product instructions so you don’t burn turf or waste effort.
If your yard gets winter salt exposure, pay attention to edges along driveways and sidewalks. Those areas may need special recovery steps, and they can throw off the whole “fresh spring look” if ignored.
A simple spring treatment plan done well beats an aggressive plan done inconsistently. The goal is a lawn that’s thick, green, and stable—so your garden plantings look even more intentional.
Lawn Care Maintenance for a Standout Yard
The difference between an “okay” yard and a standout one is maintenance rhythm. You don’t need perfection—you need consistency, especially from frost-free date through early summer when growth is fast.
Mowing: Keep it regular and keep it higher. Taller grass shades the soil, holds moisture better, and reduces weeds. Avoid cutting more than about a third of the blade at once; scalping stresses the lawn and makes it look patchy.
Watering: In Southern Ontario, spring often gives you enough rain—until it suddenly doesn’t. When you do water, water deeply and less often so roots grow down. Light daily watering trains shallow roots and makes lawns less resilient.
Edging and trimming: This is the curb appeal secret. A crisp edge along walkways, driveways, and garden borders makes everything look professionally maintained, even if your planting beds are still filling in.
Weed management: Stay ahead of it with quick weekly checks. Pulling a handful of weeds early is easier than fighting a takeover later.
Seasonal touch-ups: Top up mulch when appropriate, tidy bed lines, and keep garden beds from creeping into the lawn. That contrast—clean lawn lines against full beds—is what makes the whole yard look sharp.
If you keep mowing high, water smart, and maintain clean edges, your yard will look like it belongs on the “best on the street” shortlist all season.
Top 7 List: If You Did Nothing Else in Your Garden…
If you want the short version of early spring garden care and lawn prep before and after your first frost-free date:
- Use your frost-free date as your planting “go” signal
Hold off on frost-tender plants until your first frost-free date, then plant with confidence in the weeks right after. - Prep beds only when soil is workable
If soil is wet and clumpy, wait. When it crumbles in your hand, you can edge, top up with compost, and plant without wrecking structure. - Plant in this order: structure, fill, then colour
Start with shrubs (structure), add perennials (fullness), then finish with annuals and planters (high-impact colour). - Create instant curb appeal with planters
A few well-placed containers can make your entryway look “done” immediately—just commit to consistent watering. - Mulch for a finished look, but don’t smother the soil
Mulch helps with weeds and moisture, but a thin, even layer is better than burying everything early in spring. - Prevent bugs and disease with spacing and smart watering
Give plants airflow, avoid watering leaves late in the day, and deal with small issues early before they spread.
Keep the lawn looking sharp with high mowing and clean edges
Mow higher, mow consistently, and edge along beds and walkways—clean lines are the fastest way to look professionally maintained.
Frequently Asked Questions
When is the first frost-free date in Southern Ontario?
It’s usually in mid to late May, but it varies by community and year—use it as a planning anchor, then watch the forecast for late cold snaps.
What can I plant before the frost-free date?
Stick to hardy, cold-tolerant plants and prep work like edging, soil improvement (when workable), and setting up raised beds and planters. Save frost-tender annuals for after.
How do I know when my garden soil is workable in spring?
Grab a handful and squeeze: if it forms a wet ball and stays stuck, it’s too early. If it crumbles apart, the soil is workable and you can prep and plant without compacting it.
Should I mulch right after the frost-free date?
You can, but don’t go too thick. A thin, even layer is best—mulching too early or too heavily can keep soil cooler and wetter than you want in spring.
What’s the simplest way to make my yard look “professionally maintained” fast?
Focus on clean edges and consistency: mow higher, mow regularly, keep borders crisp, and use a few planters for instant colour and impact.
Keep Going with Your Spring Planting Momentum
Spring planting in Southern Ontario isn’t just about what you plant—it’s about timing, consistency, and simple habits that keep your yard looking “done” as everything takes off after your first frost-free date. If you followed the steps in this spring planting guide, you’ve already handled the hard part: you’ve got a plan, you’re planting at the right time, and you’re building a yard that looks intentional.
If you want to keep learning and tightening up your routine as the season moves forward, you can browse DIY advice anytime here: Lawn Care Tips.
And if you’d rather skip the trial-and-error (or you just want the finished look faster), these services line up with the exact tasks covered in this spring planting guide:
- Garden help with planning, planting, and seasonal upkeep:
Gardening Service - Support for lawn health during the spring growth surge:
Lawn Treatments - A clean, finished look for beds plus easier weed control and moisture retention:
Mulch Installation
Whether you DIY it all or bring in a hand for the heavy lifting, the main takeaway is the same: work with the frost-free window, build structure first, then fill and add colour, and keep up with clean edges and consistent maintenance. That’s how you get the best-looking yard on the street—and keep it that way.